Throughout this site we make recommendations for products that we like and that we think you will like also. At no additional cost to you, we may earn an affiliate commission if you buy these products through one of our links.
How to Repair Bumper Plates Mechanically
Update: The WodHardware bumper plate repair kit product has been discontinued. For an alternative solution to loose inserts, try the gluing method along with adopting a “no ghost riding” policy. Click here for detailed gluing instructions.
For the DIY mechanical approach, the original repair kit design and installation instructions are detailed below.
Heavy use from high intensity workouts can wear out the metal inserts in the center of rubber weightlifting bumper plates. Too often, the weights are dropped from overhead which loosens the inserts over time making them troublesome and frustrating to use. It doesn’t take long in a busy gym environment to end up with a stack of floppy damaged bumpers that need to be replaced.
There’s no need to trash them just yet. Some simple temporary repairs will help delay replacement and help get some more life out of them. There are also many alternative uses for bumper plates beyond repair.
The recommended method of repair is to glue the insert back in place with epoxy. There’s a great trick that makes gluing easy. Check out this article with detailed instructions if you want to learn how to glue loose bumper plate inserts the easy way.
The WodHardware bumper plate repair kit product is no longer for sale here. The gluing method makes an adequate repair, is easier to do and is less expensive. But in the spirit of sharing ideas and helpful information, the repair kit design plans and installation instructions are detailed below. If you have metalworking skills or can collaborate with a machinist maybe you will prefer the mechanical approach.
Even though these temporary repair techniques will extend the life of a worn-out plate, the best solution in the long run is to buy bumper plates with anchored or hooked inserts. Fringesport and Vulcan are the top choices because they take an extra step to weld reinforcing bars onto the inserts which then become embedded in the rubber. These parts are firmly anchored into the body of the bumper plate effectively preventing the loose insert problem.
It’s also a good idea to review your gym policies and make any changes to get more life out of your equipment. It makes a huge difference to lower the barbell with control rather than letting it free-fall from overhead.
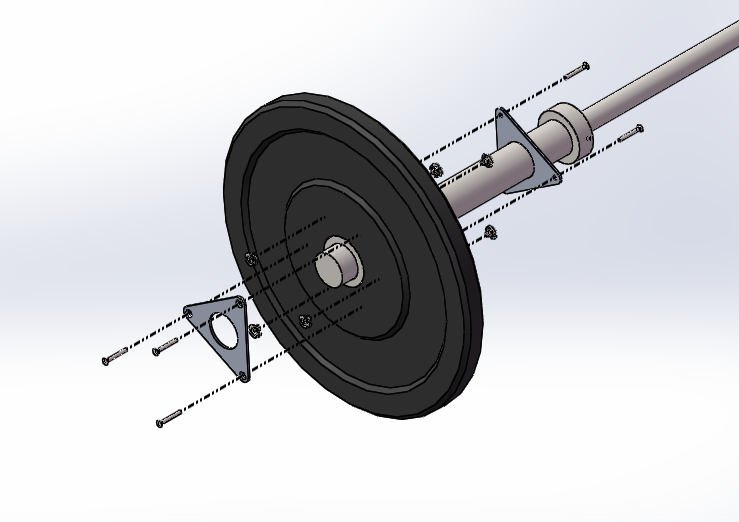
The repair kit design
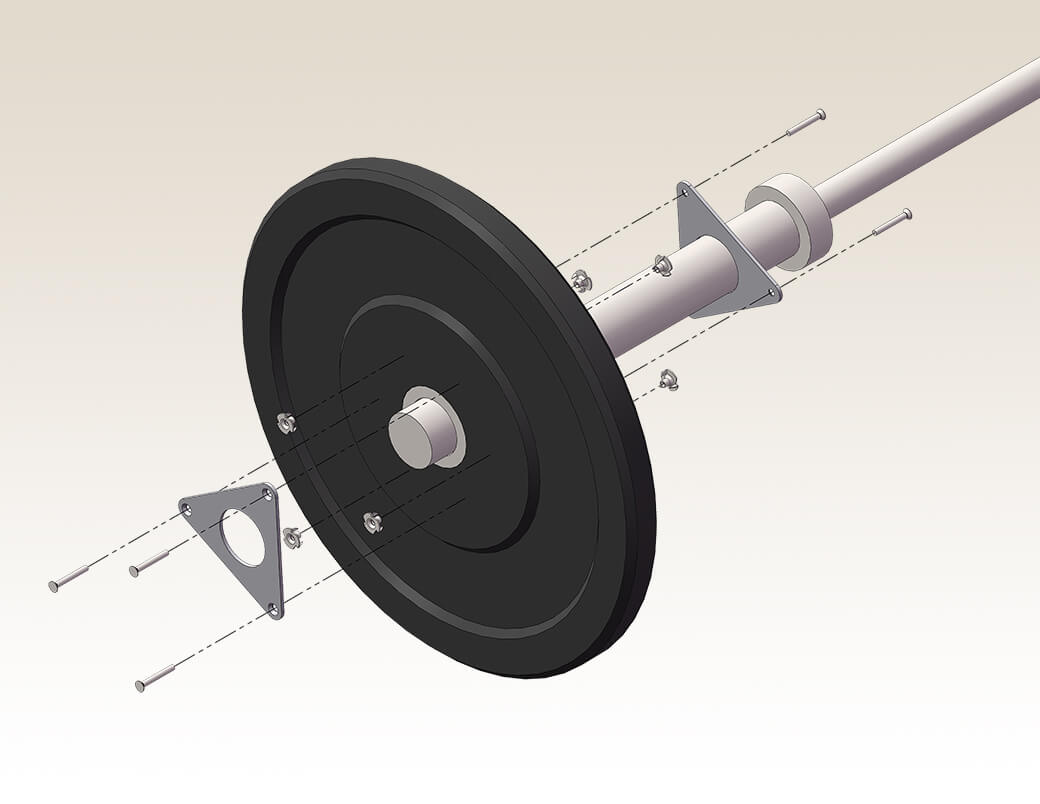
The repair kit comprises two repair plates, six machine screws, six t-nuts, and two 1” deck screws. Repair plates sandwich the bumper plate and are secured, one on each side, by drilling through and attaching them to the rubber body mechanically.
Instead of circular repair plates, the triangular design allows for easier installation without the need to align the holes of plates opposite of each other. Each plate is independent of the other and rotated 60 degrees for hardware clearance. It’s all about clearance, Clarence!
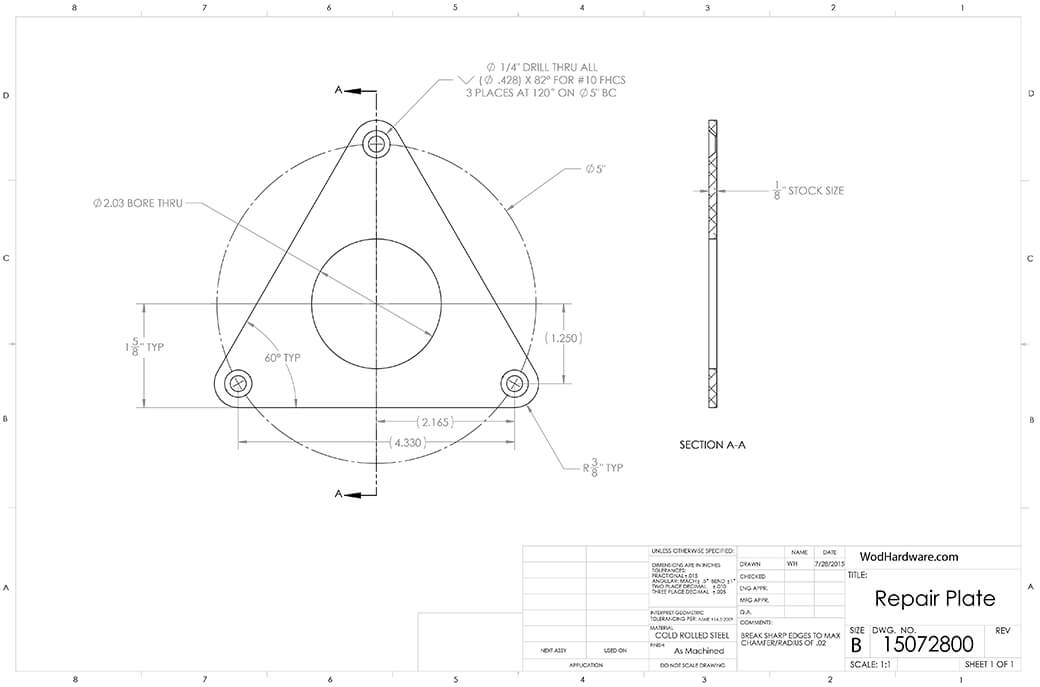
Cold rolled steel is called out. To avoid hardware pull-through, the tougher the material the better.
Get the full size, printable pdf version here.
A note about machine screws.
The original kit used 10-32 flat head screws to keep a low profile with the screw heads flush with the plate surface. If you care more about strength than low profile, step up the size of the hardware to 1/4-20 hex head machine screws (with 1/4-20 t-nuts) and don’t bother with countersunk holes in the repair plates. 1/4 inch screws are stronger than #10s and available in longer lengths. Anything softer (or smaller) than an alloy steel 10-32 screw will not be strong enough. Another low profile approach would be to increase the thickness of the repair plates to 3/16 or 1/4 inch, countersink the holes and use 1/4-20 flat head screws. Low profile would be achieved but the weight of the kit would also increase.
Sourcing the necessary materials
Below is a list of online sources for materials needed to build and install the kits. WodHardware earns a commission at no additional cost to you if you purchase through these links. (Thank you for your support if you choose to make a purchase.) Alternatively, most of these items can be sourced locally if there is a good hardware store nearby.
Low Profile Design
1/8” steel plate
10-32 flat head machine screws in high strength alloy steel
10-32 t-nuts
1/4” drill
Deck screws
Loctite medium strength self priming threadlocker
Strengthened Design Alternatives (see “machine screws” note above)
3/16” steel plate
1/4” steel plate
1/4-20 flat head machine screws in high strength alloy steel
1/4-20 t-nuts
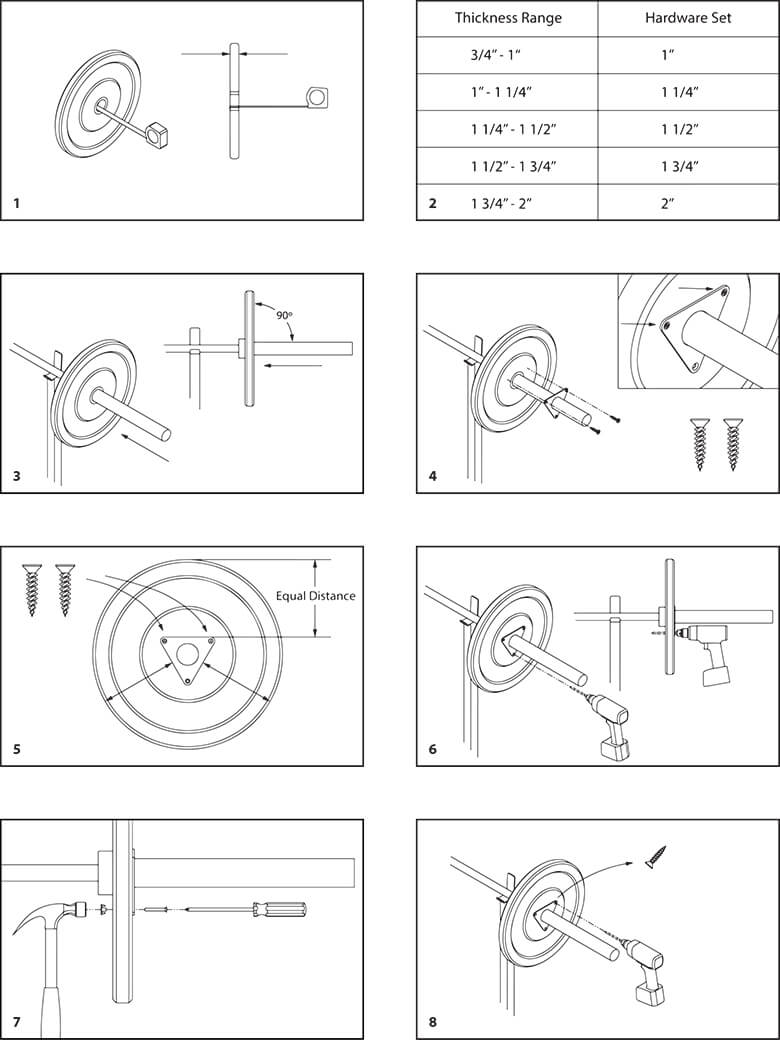
Installation instructions
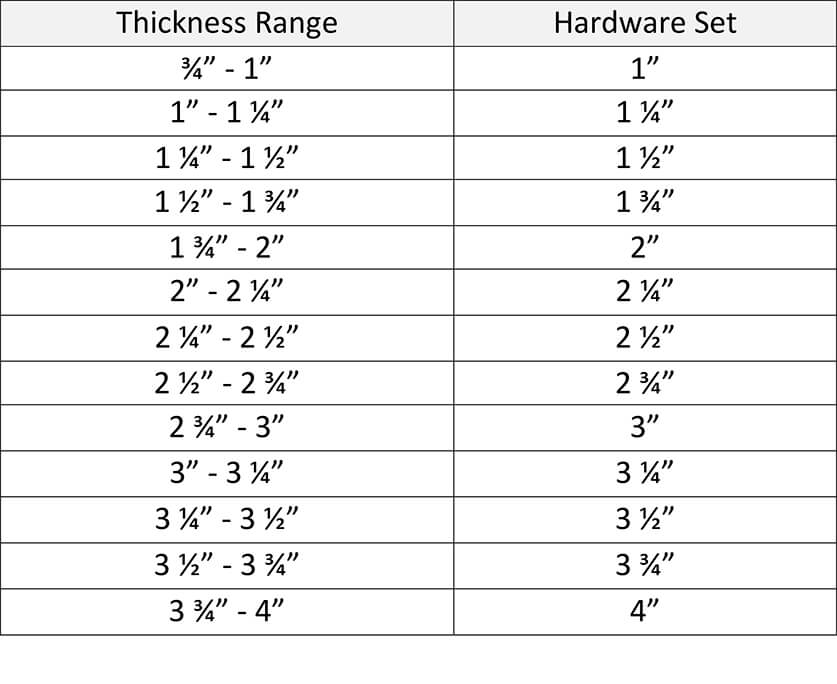
The following set of images are the illustrated instructions that used to come with the kits. Full pdf version can be downloaded here. Since the length of the machine screws depends on the thickness of the bumper plate, the hardware set chart was used as a guide to select and ship out the correct standard length screws. Ignore the chart. The objective is to choose screw length such that the installed kit has no protruding screw ends.
Included after the illustrations are the original prototype installation instructions. The photos help show the procedure.


Original Installation Procedure for the Prototype Kits
Step 1. Gather Tools and Materials – Here is what you need:
- Safety glasses and disposable rubber gloves
- Blown out bumper plate – The kit is intended to repair a loose center bushing. It is not intended for new bumper plates or plates with damage to areas other than the center bushing. Don’t install the kit unless the bumper plate is otherwise headed to the garbage.
- Repair Kit – Make sure the screws are the correct length (see step 3)
- Olympic Bar and Rack – To aid in installation of the repair kit
- 1/4″ Drill Bit
- Portable Drill
- 2 Short Drywall Screws – For aid in installation
- LocTite 243 Medium Strength Primerless Threadlocker
- 1/8” Allen Wrench or Attachment for the Drill
- #2 Philips Screwdriver or Attachment for the Drill
- Hammer – To set the T-nuts
Step 2. Be safe. Review the Loctite package warning, have your rubber gloves handy and put on your safety glasses. Loctite MSDS can be found on the Henkel website:
http://www.henkelna.com/industrial/product-search-1554.htm?nodeid=8797952212993
Step 3. Make sure the screws are the correct length.
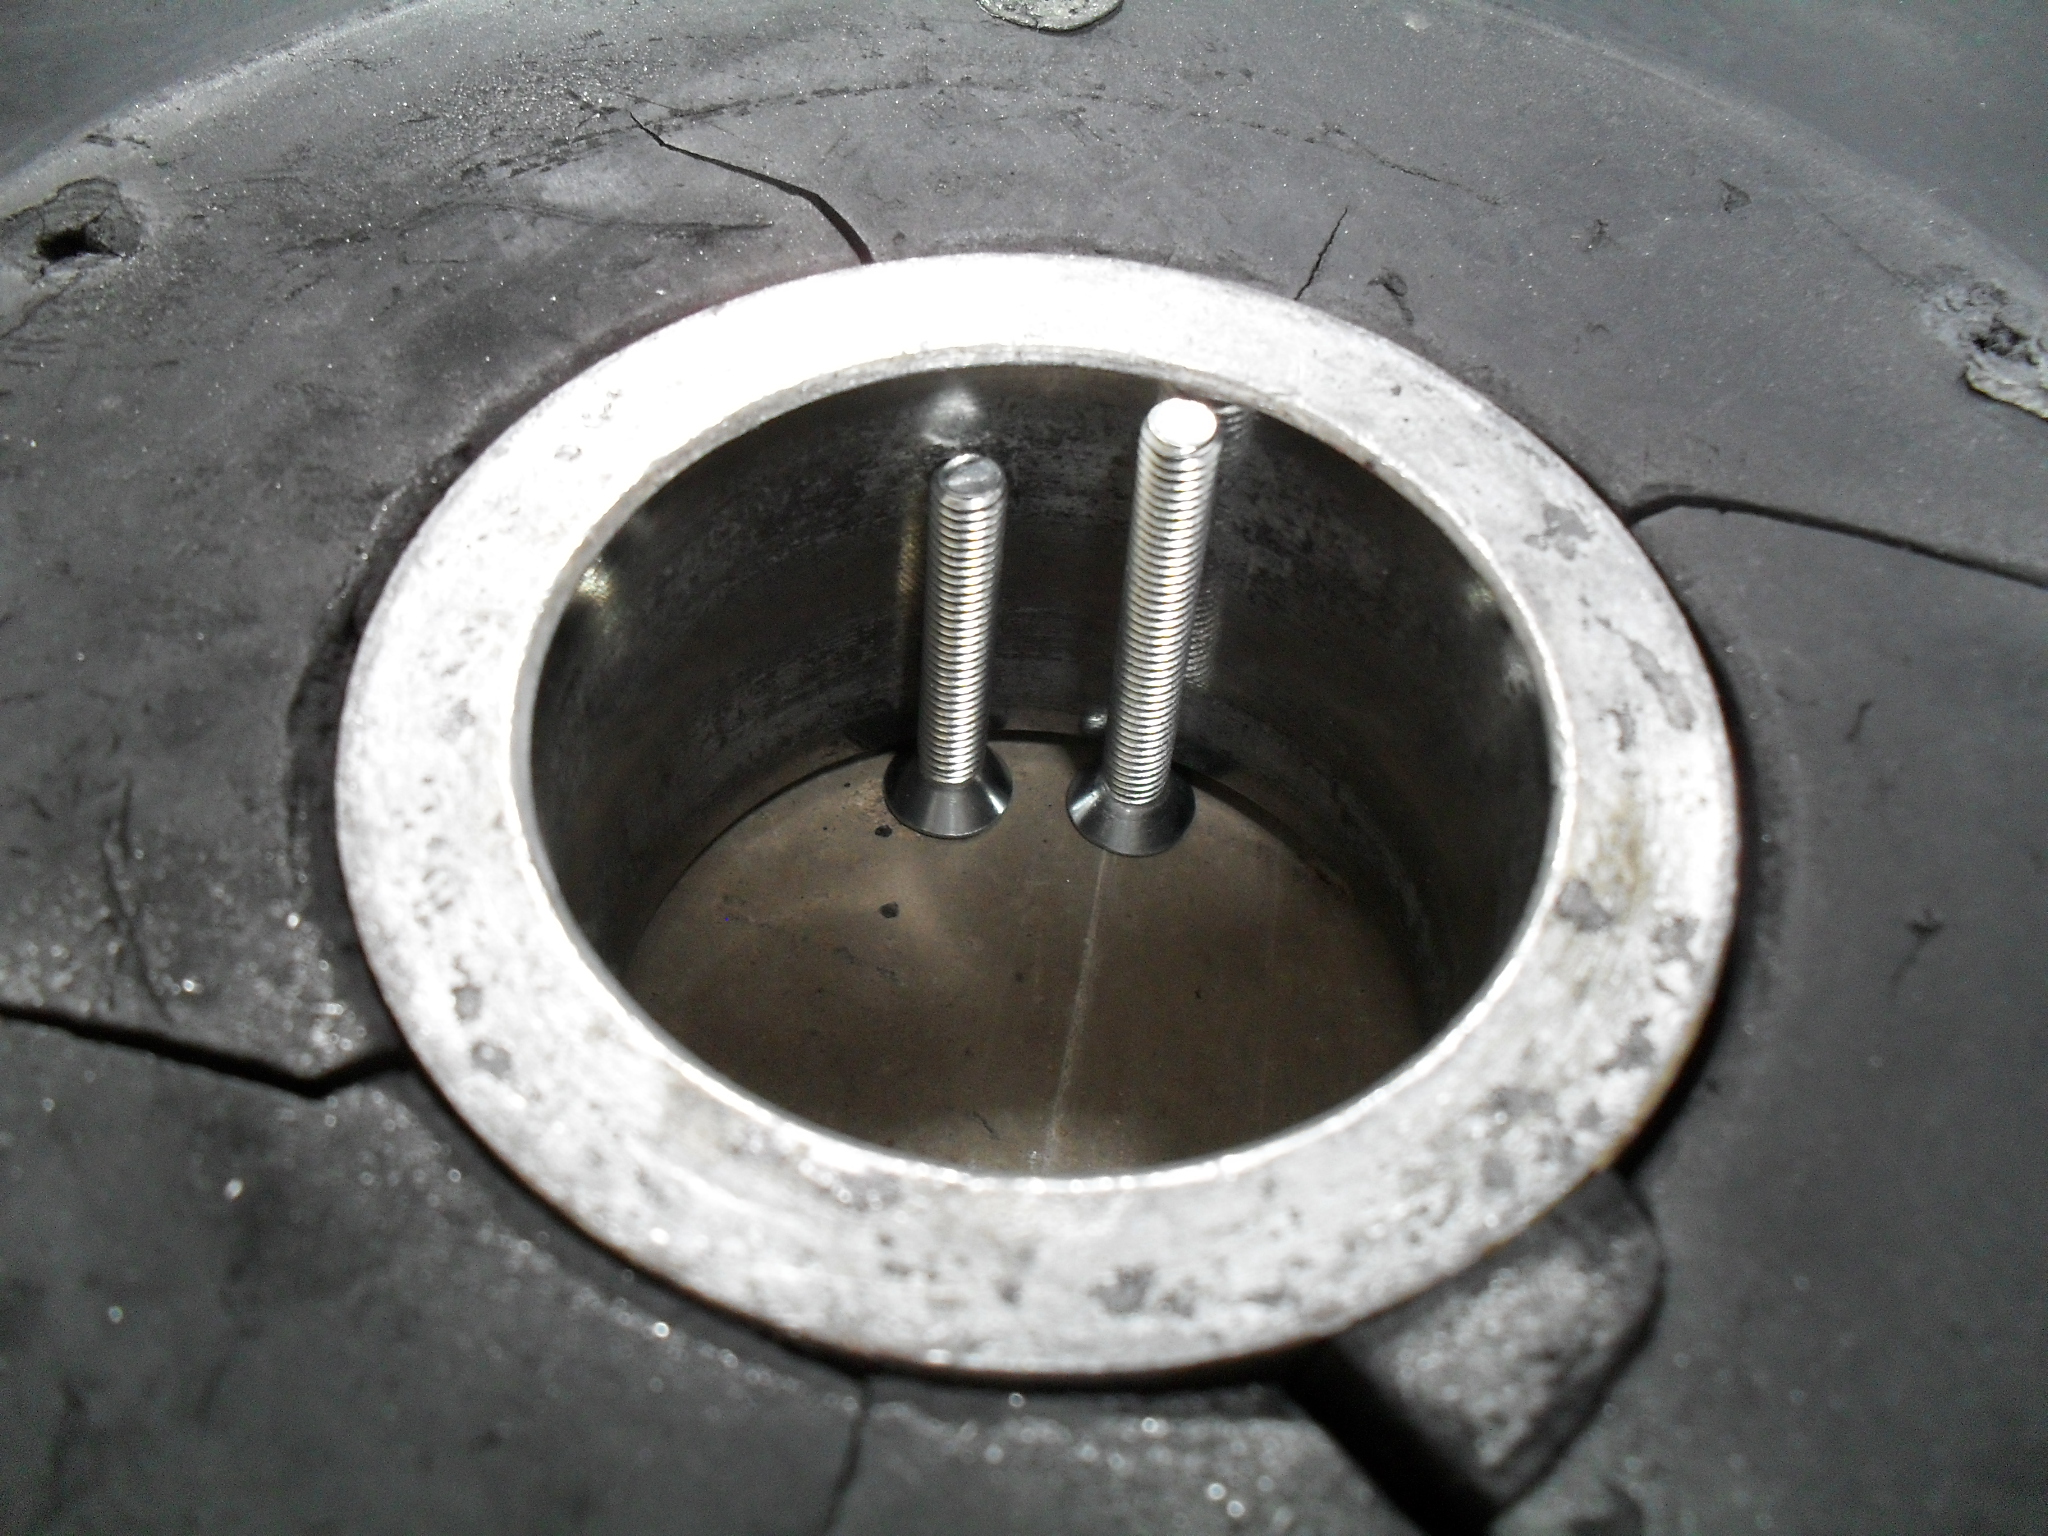 Pictured above, the screw on the right is correct, the one on the left is too short. Get the right length screws if you have the wrong ones in the kit. They should be approximately the same length as the thickness of the center bushing. Screw type is 10-32 flat head.
Step 4. Hang the bumper plate and a repair plate on a racked Olympic bar with the repair plate countersinks facing out.
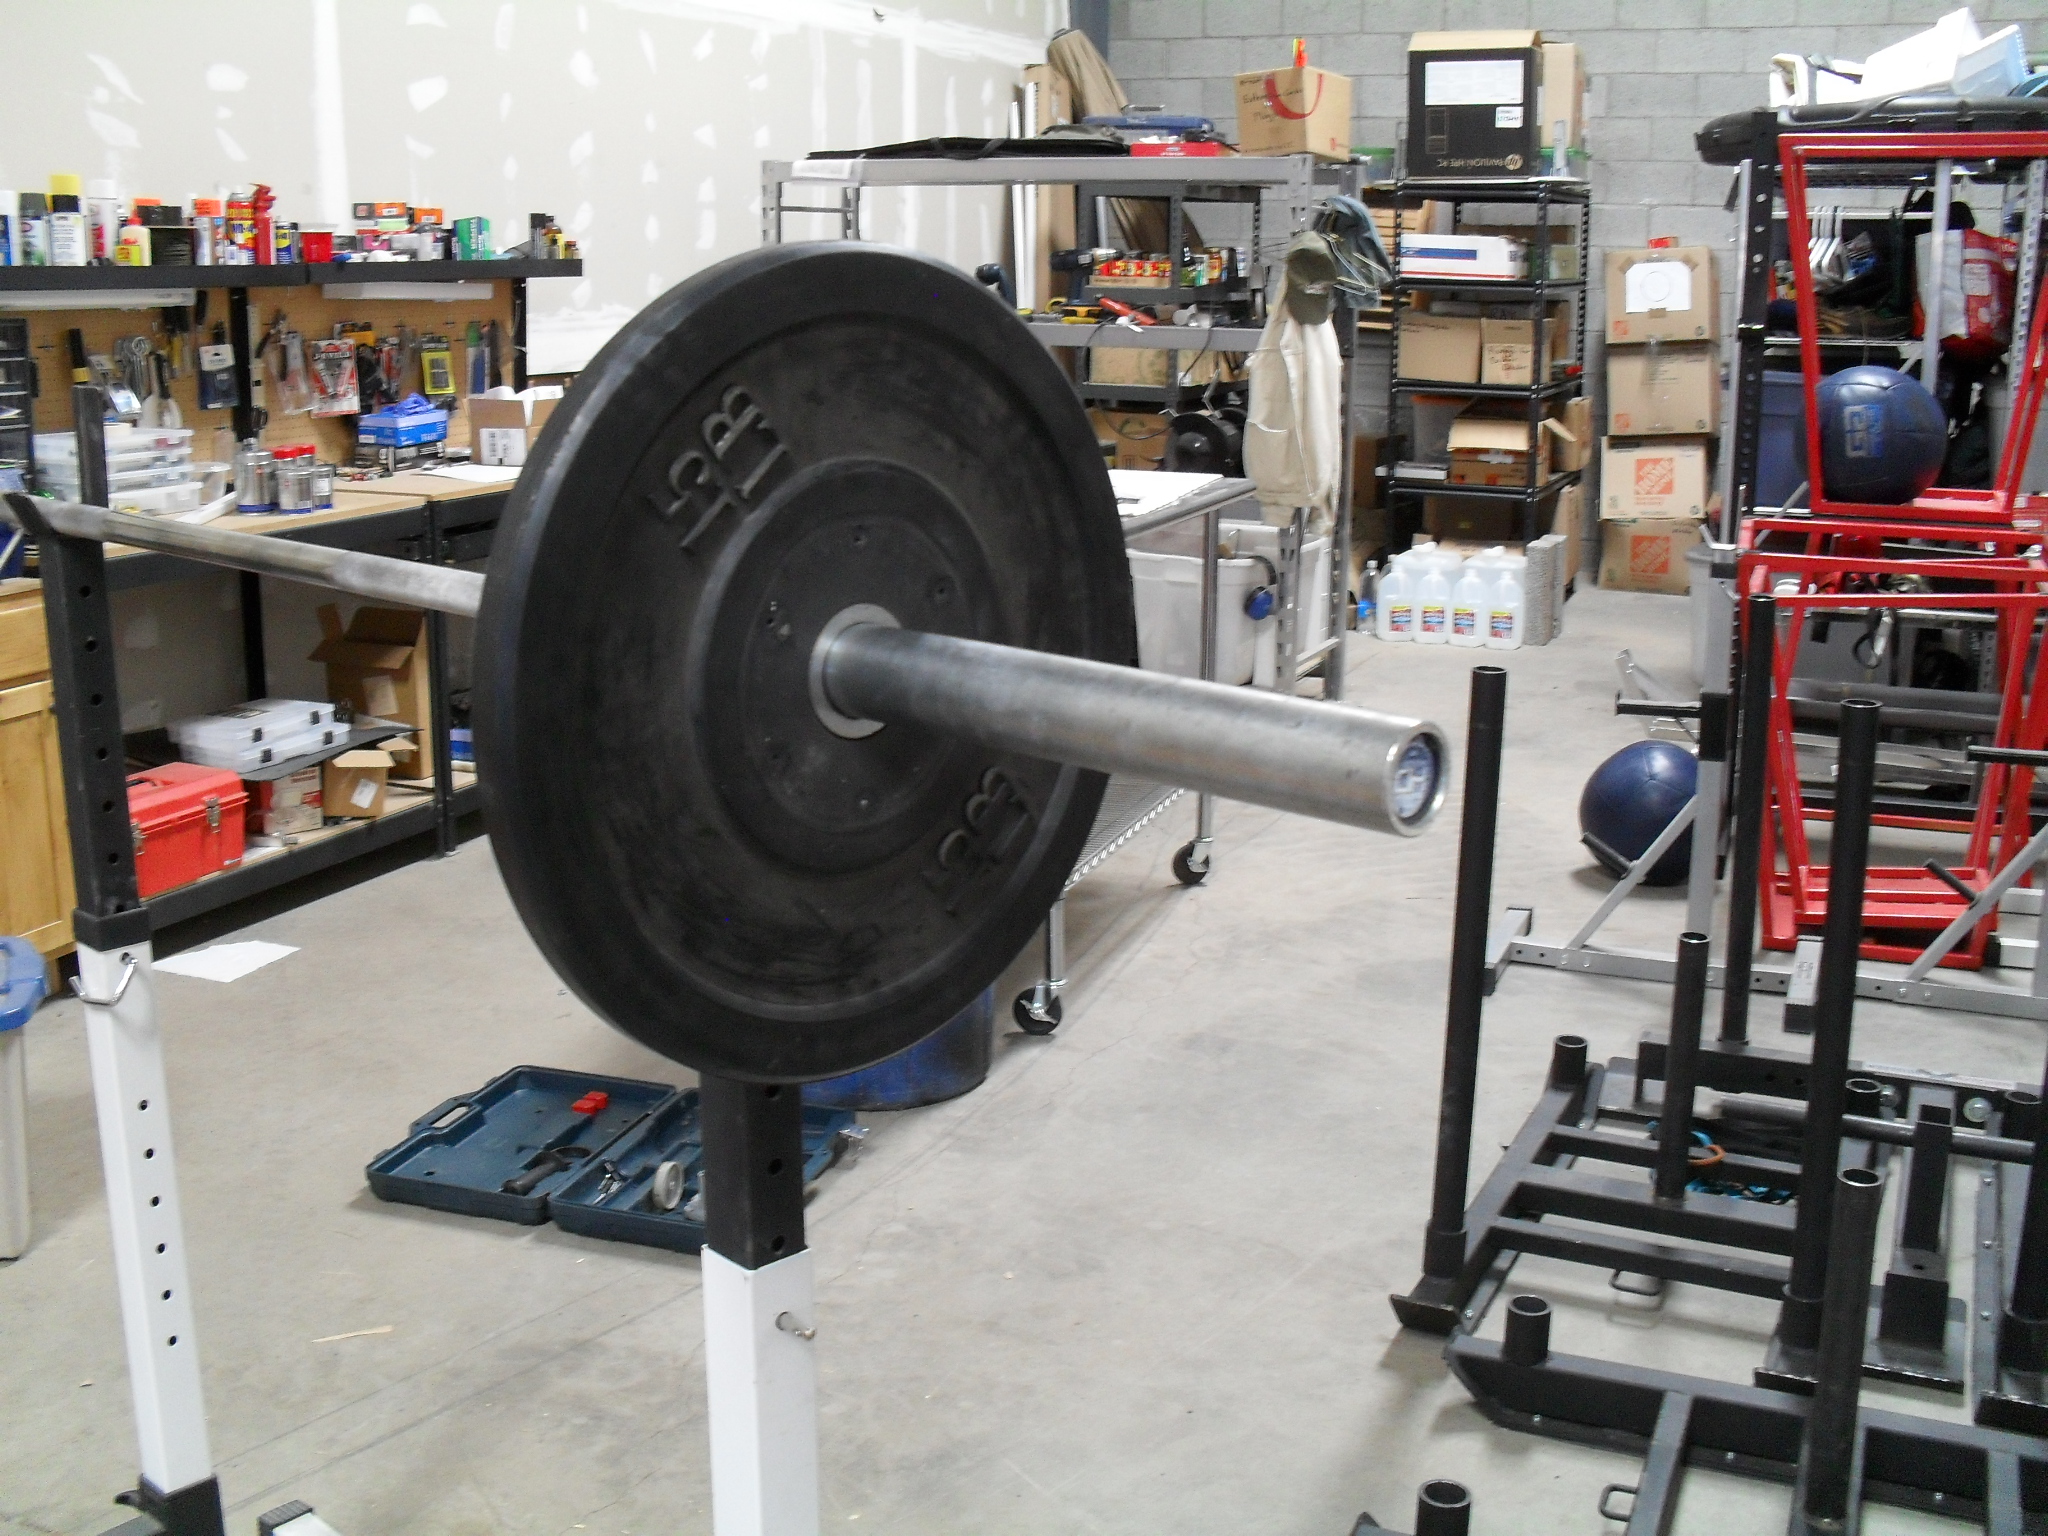
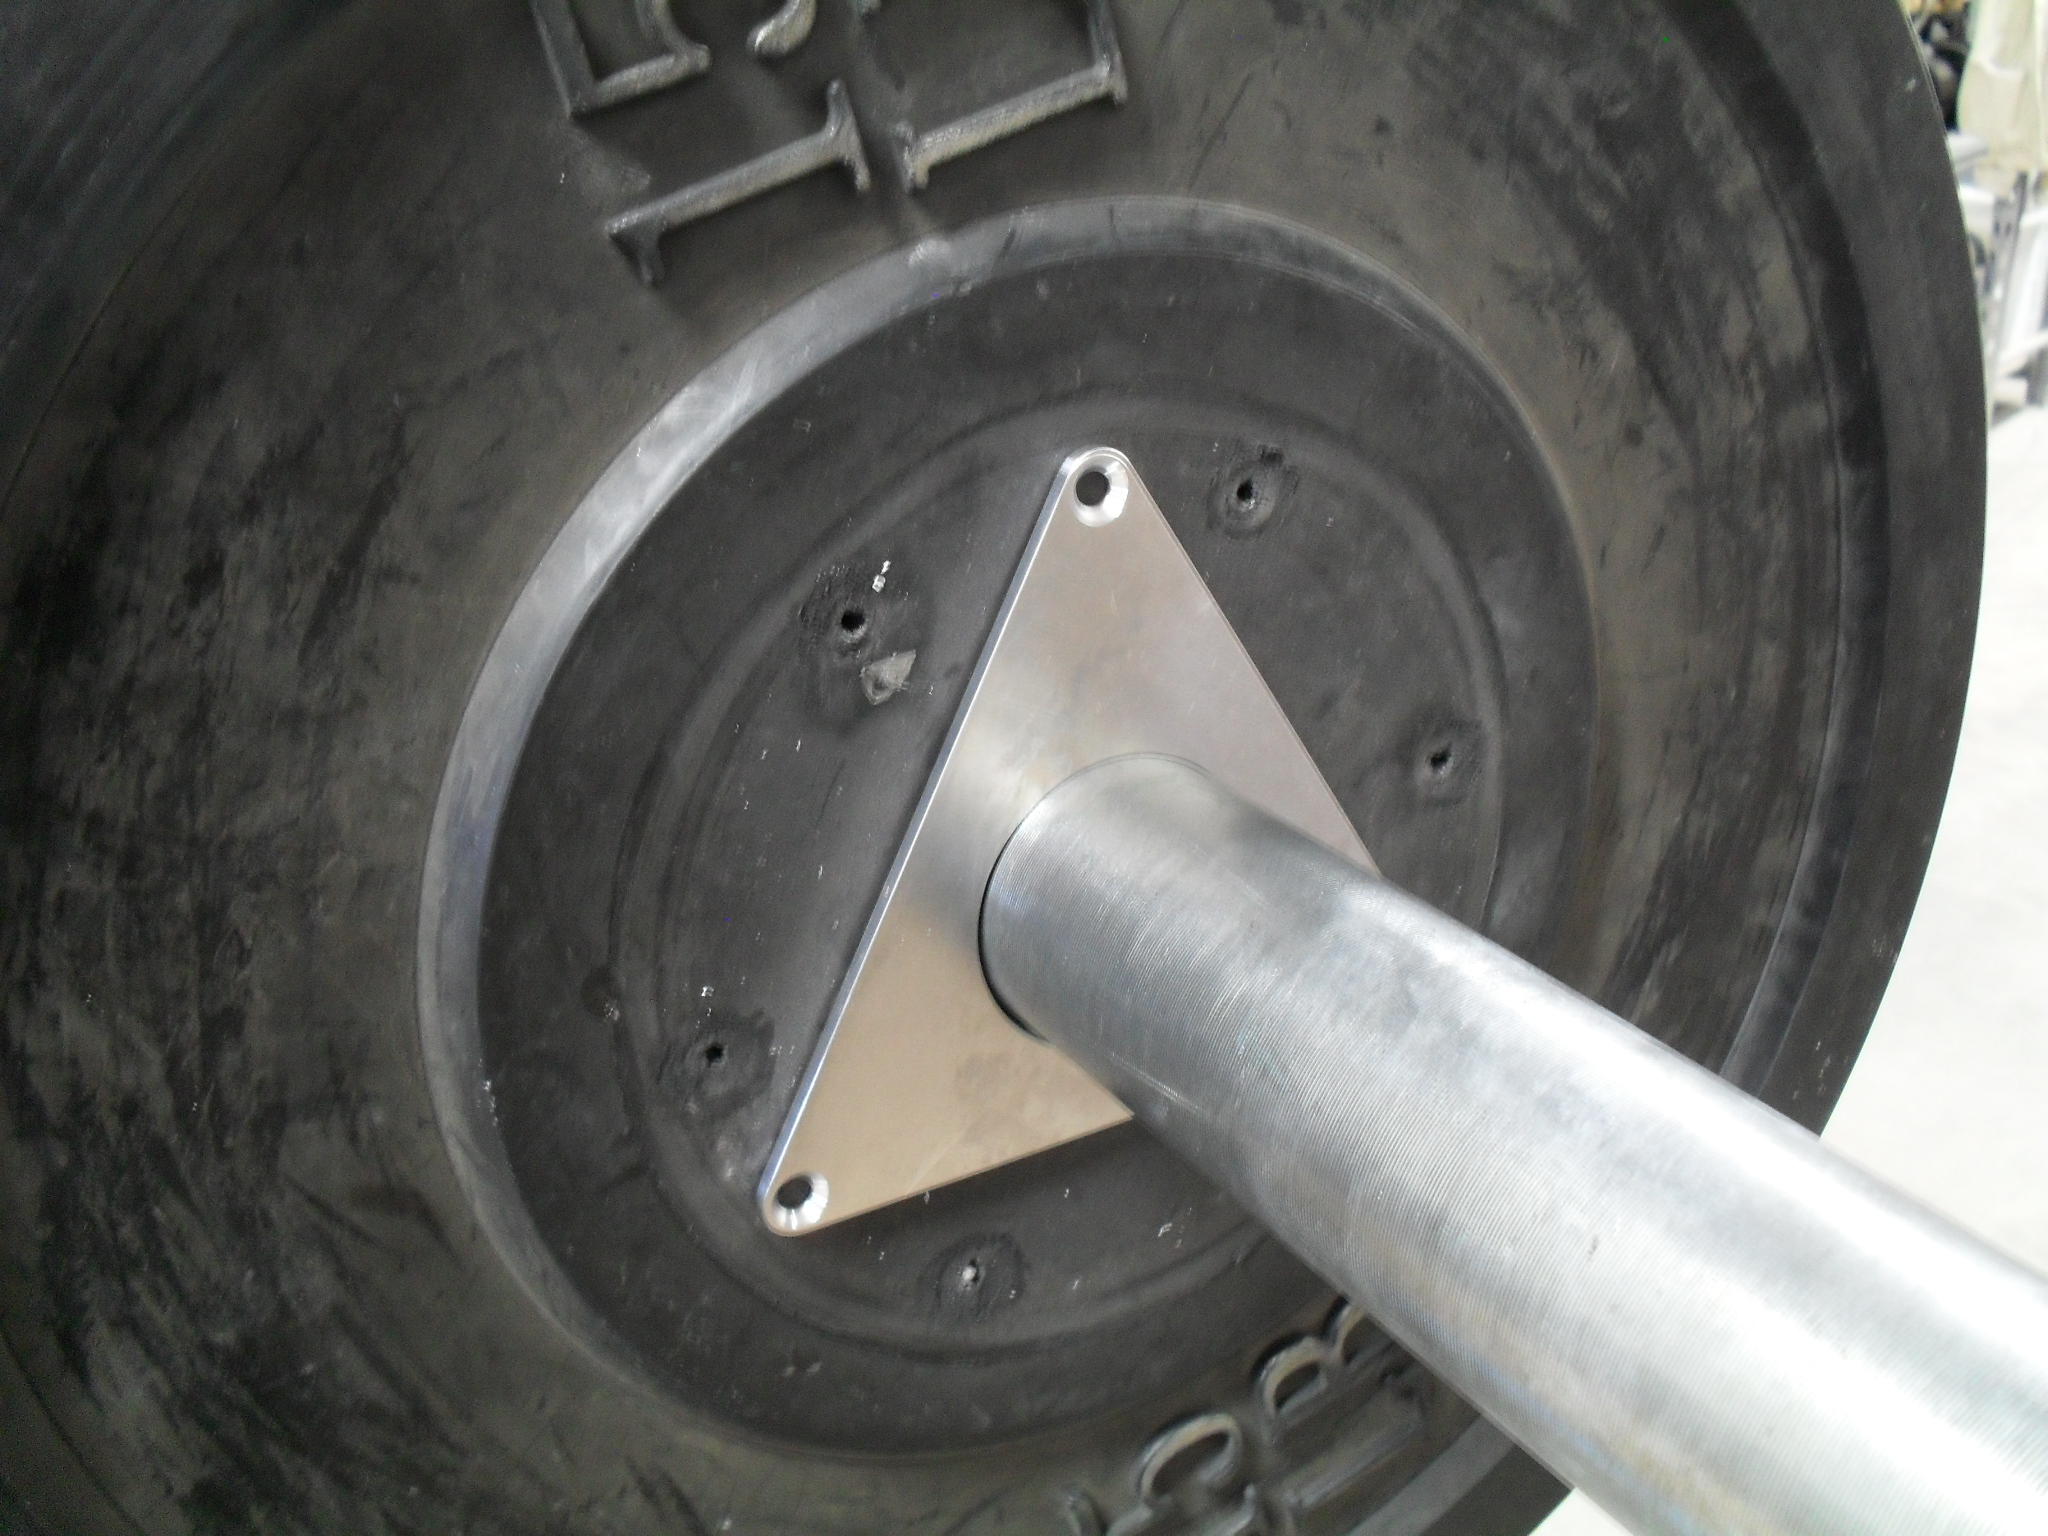 Step 5. Secure the repair plate and drill the first hole – Hold the repair plate with 2 short drywall screws screwed right into the rubber through two of the three mounting holes. This will secure the repair plate while you drill. For best results, push the bumper plate up against the flange on the Olympic bar to keep it perpendicular while securing the repair plate. Drill a 1/4″ hole all the way through the bumper plate right through one of the mounting holes. Make sure the hole is cleared of all rubber debris.
 Step 6. Install a T-nut and a screw. The T-nut goes in on the reverse side opposite the repair plate with the sharp teeth toward the rubber. You will have to set the T-nut with a hammer.
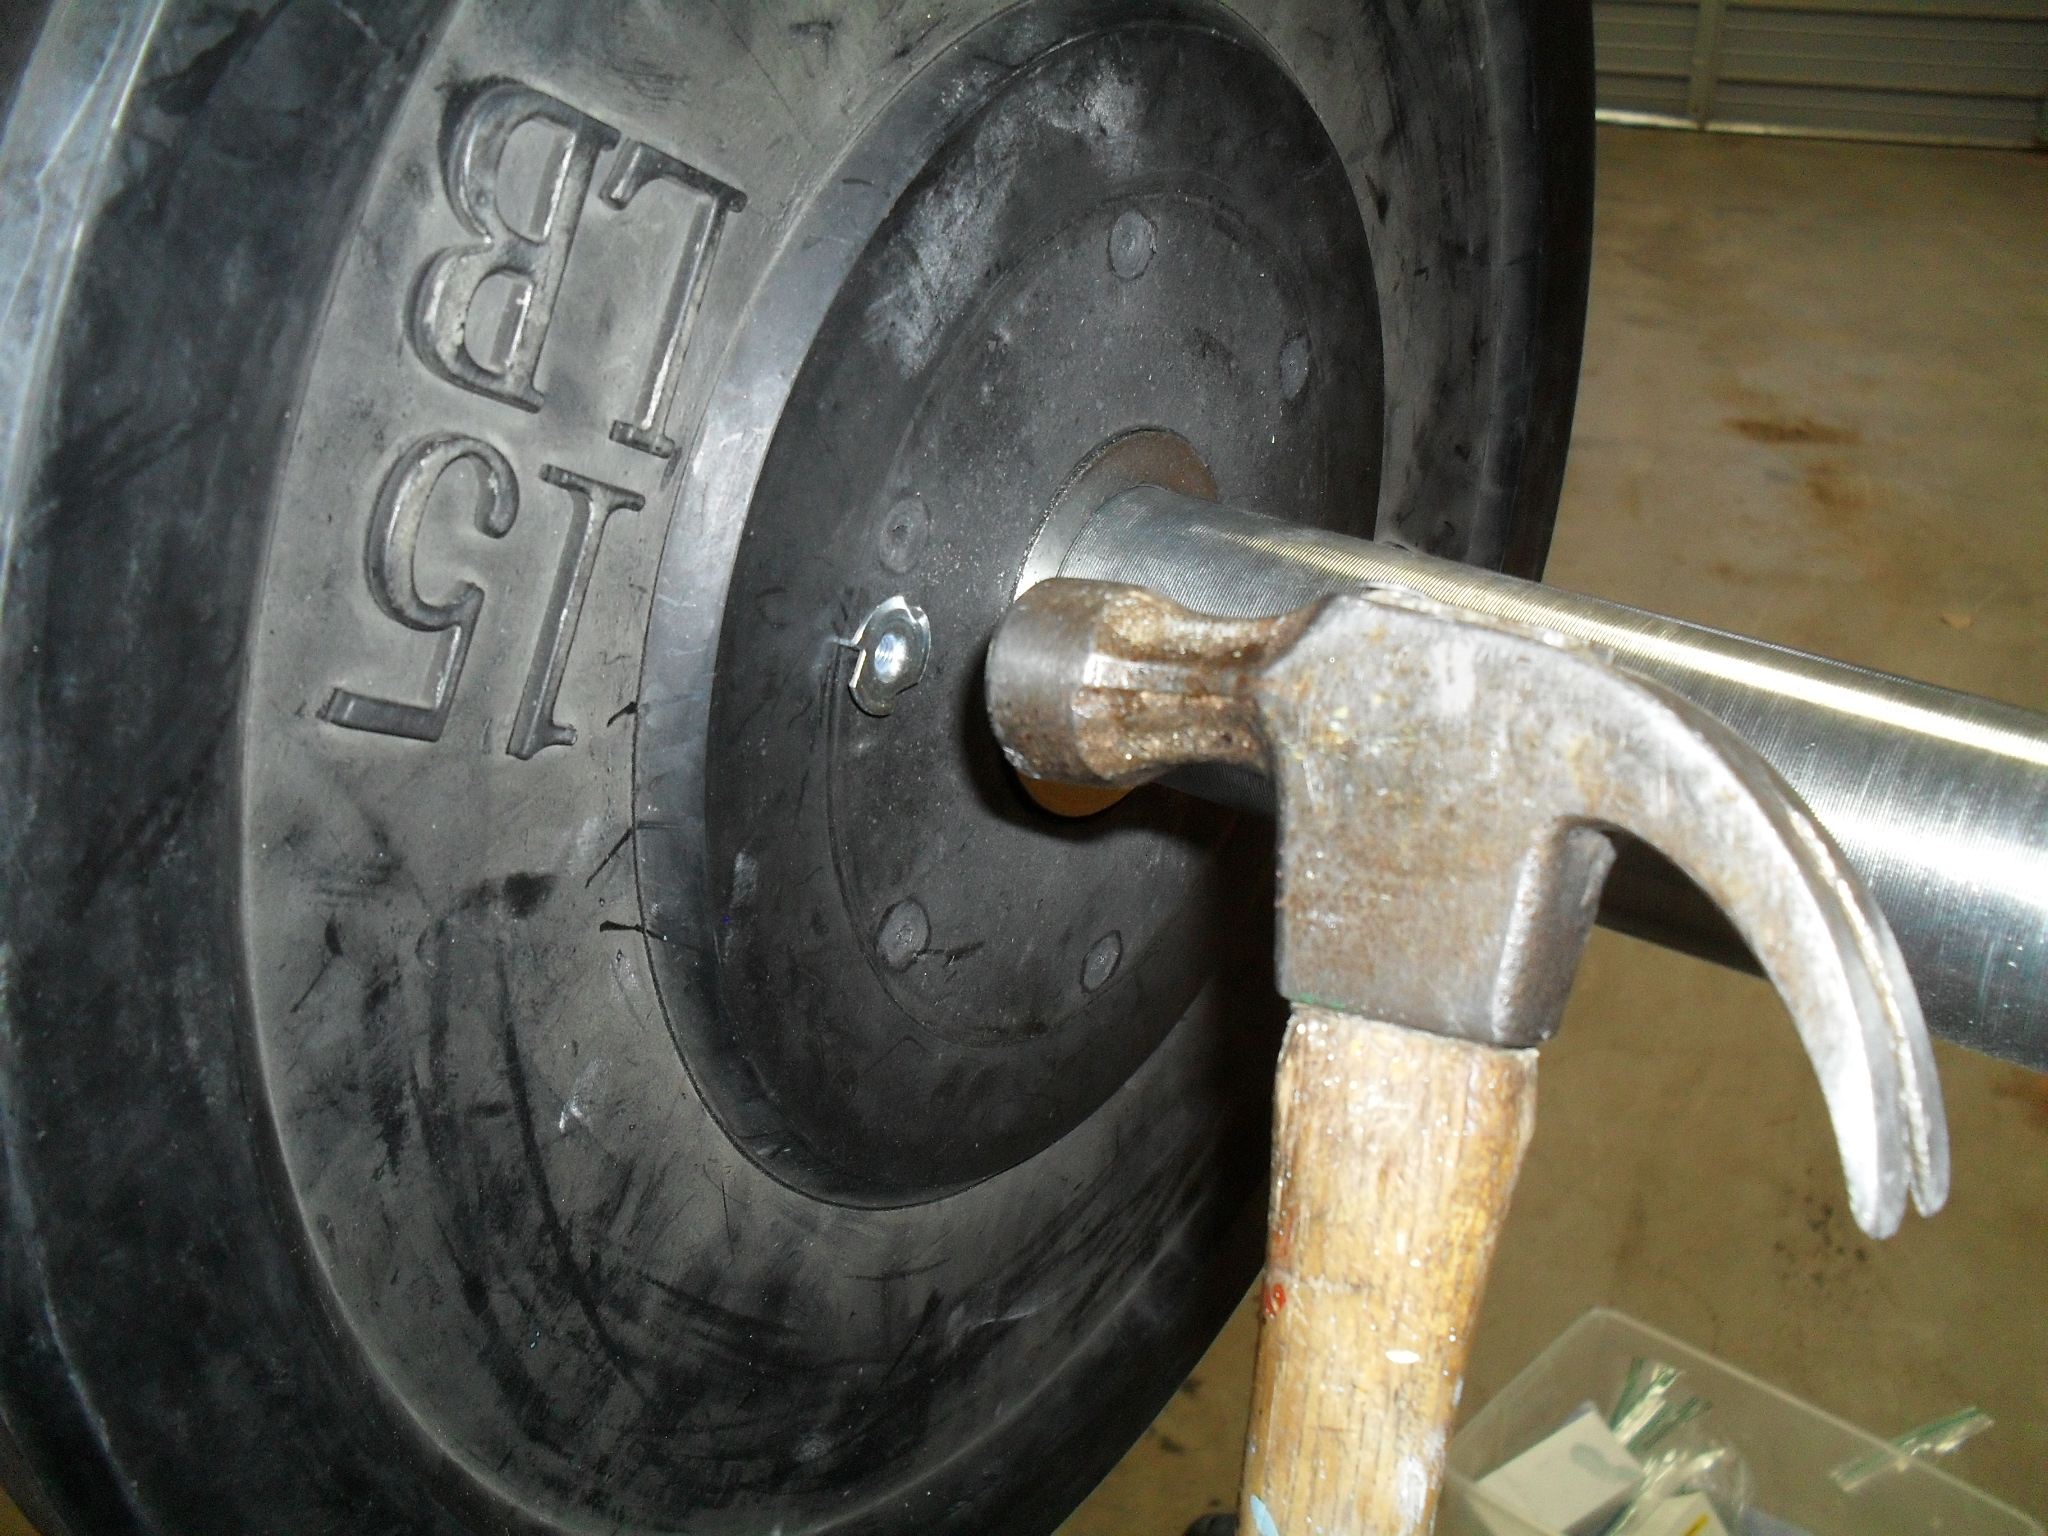 Hand tighten the first screw to maintain repair plate positioning.
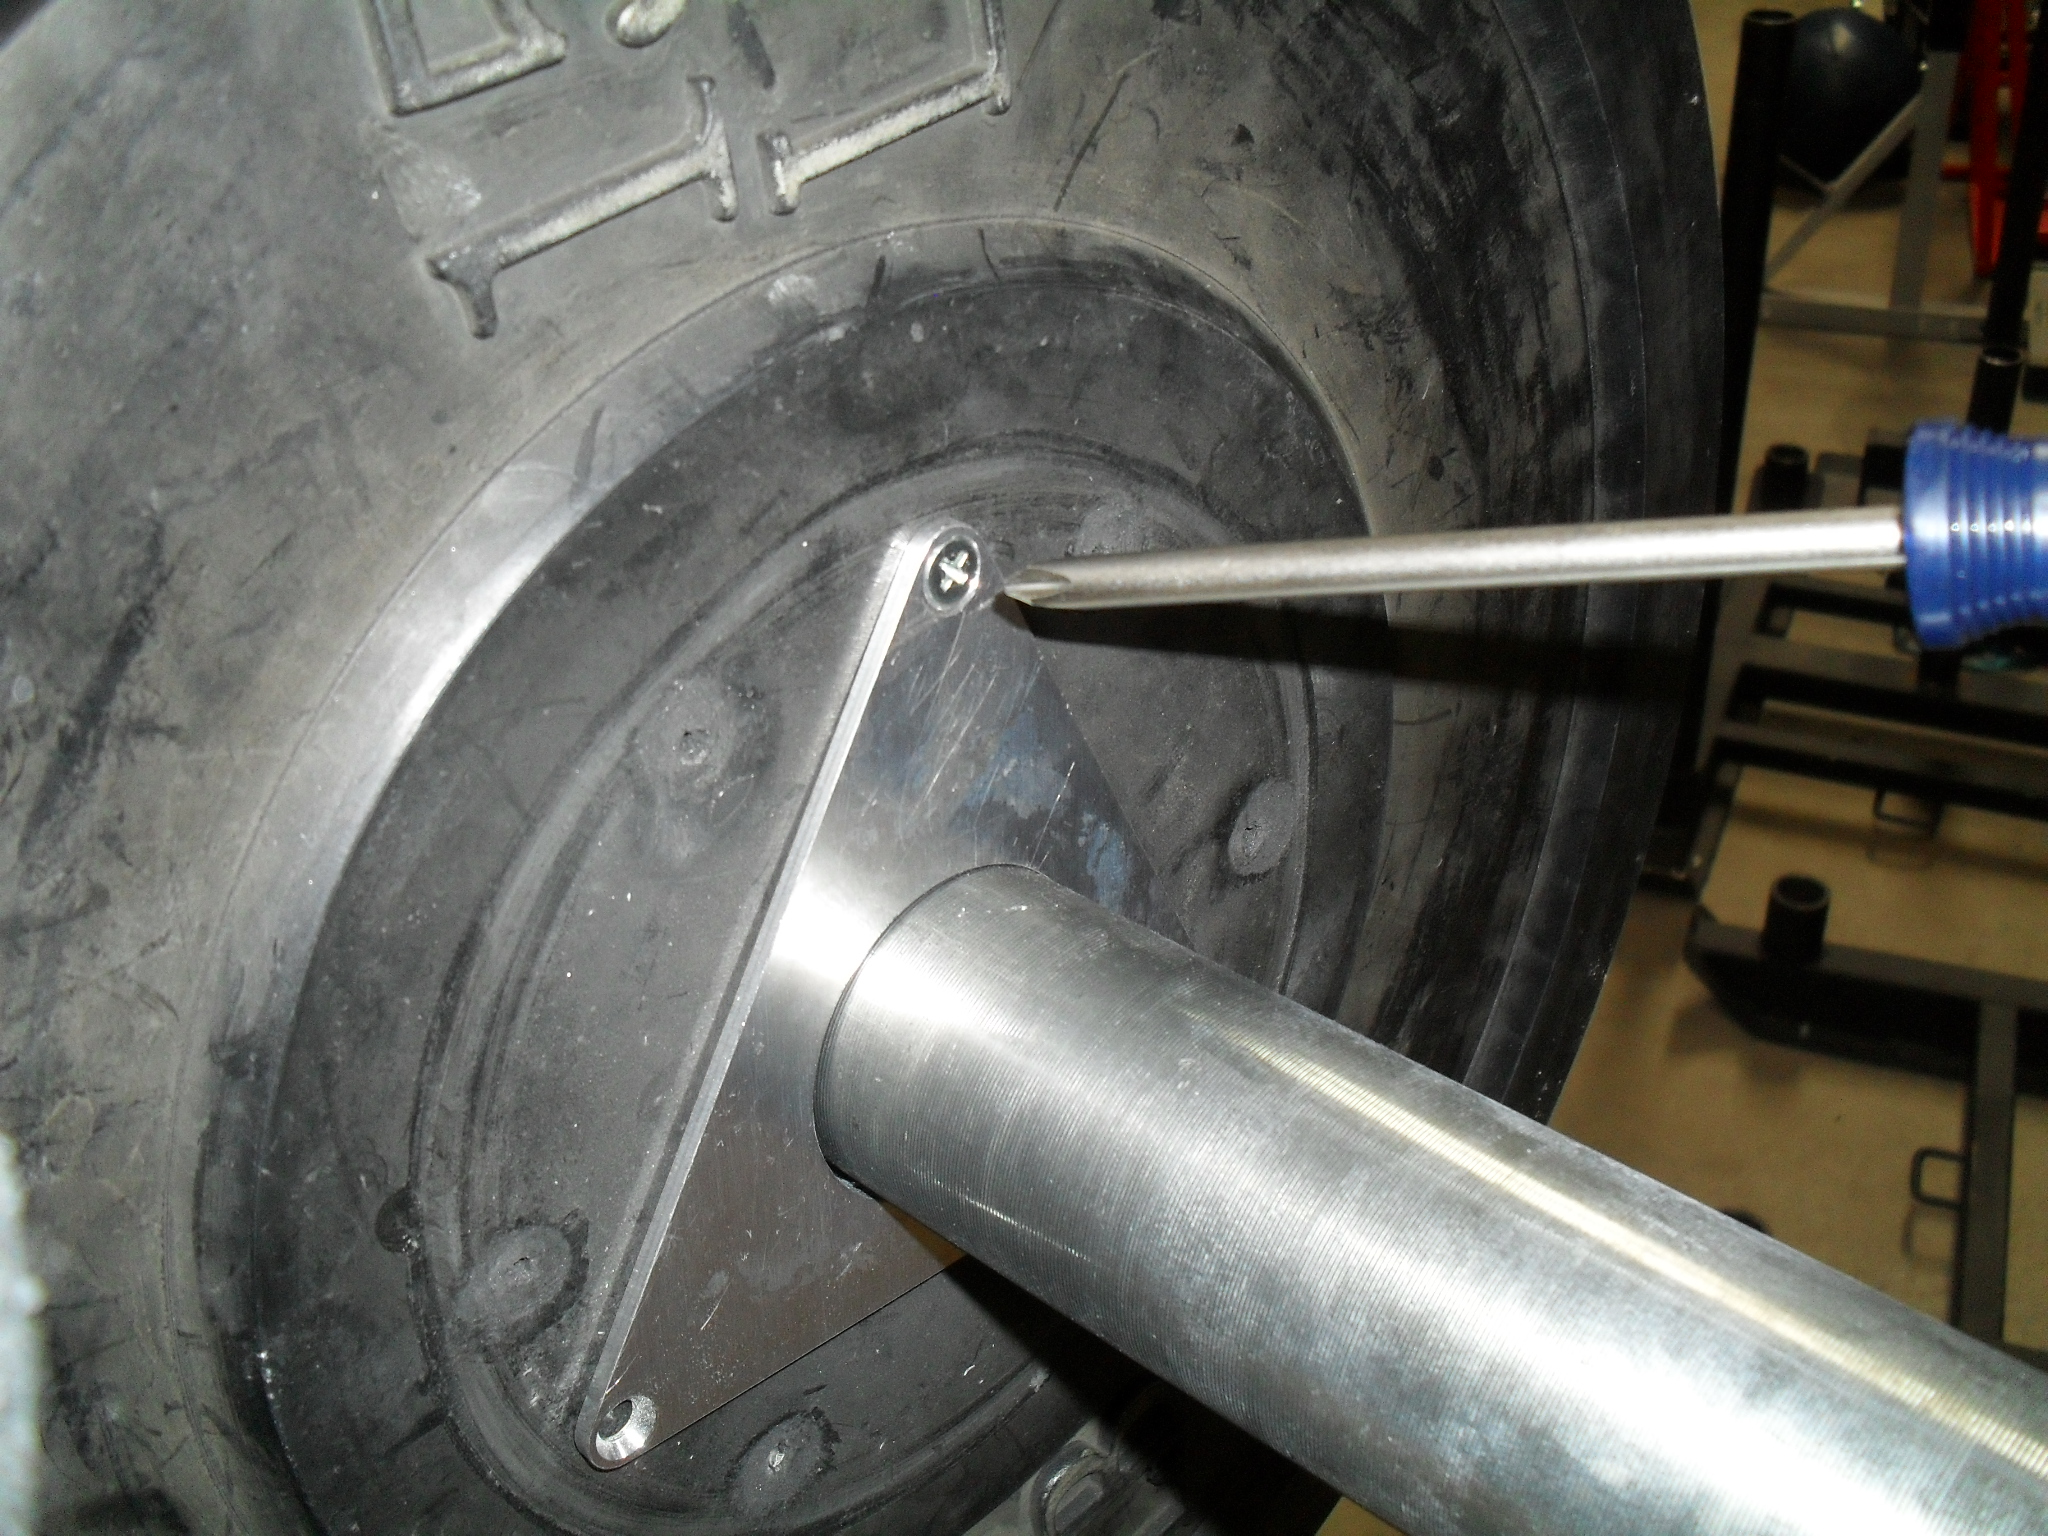 Step 7. Install two more mounting screws – One at a time, remove a drywall screw, drill a 1/4″ through hole, clear the rubber debris, set a T-nut and hand tighten a mounting screw.
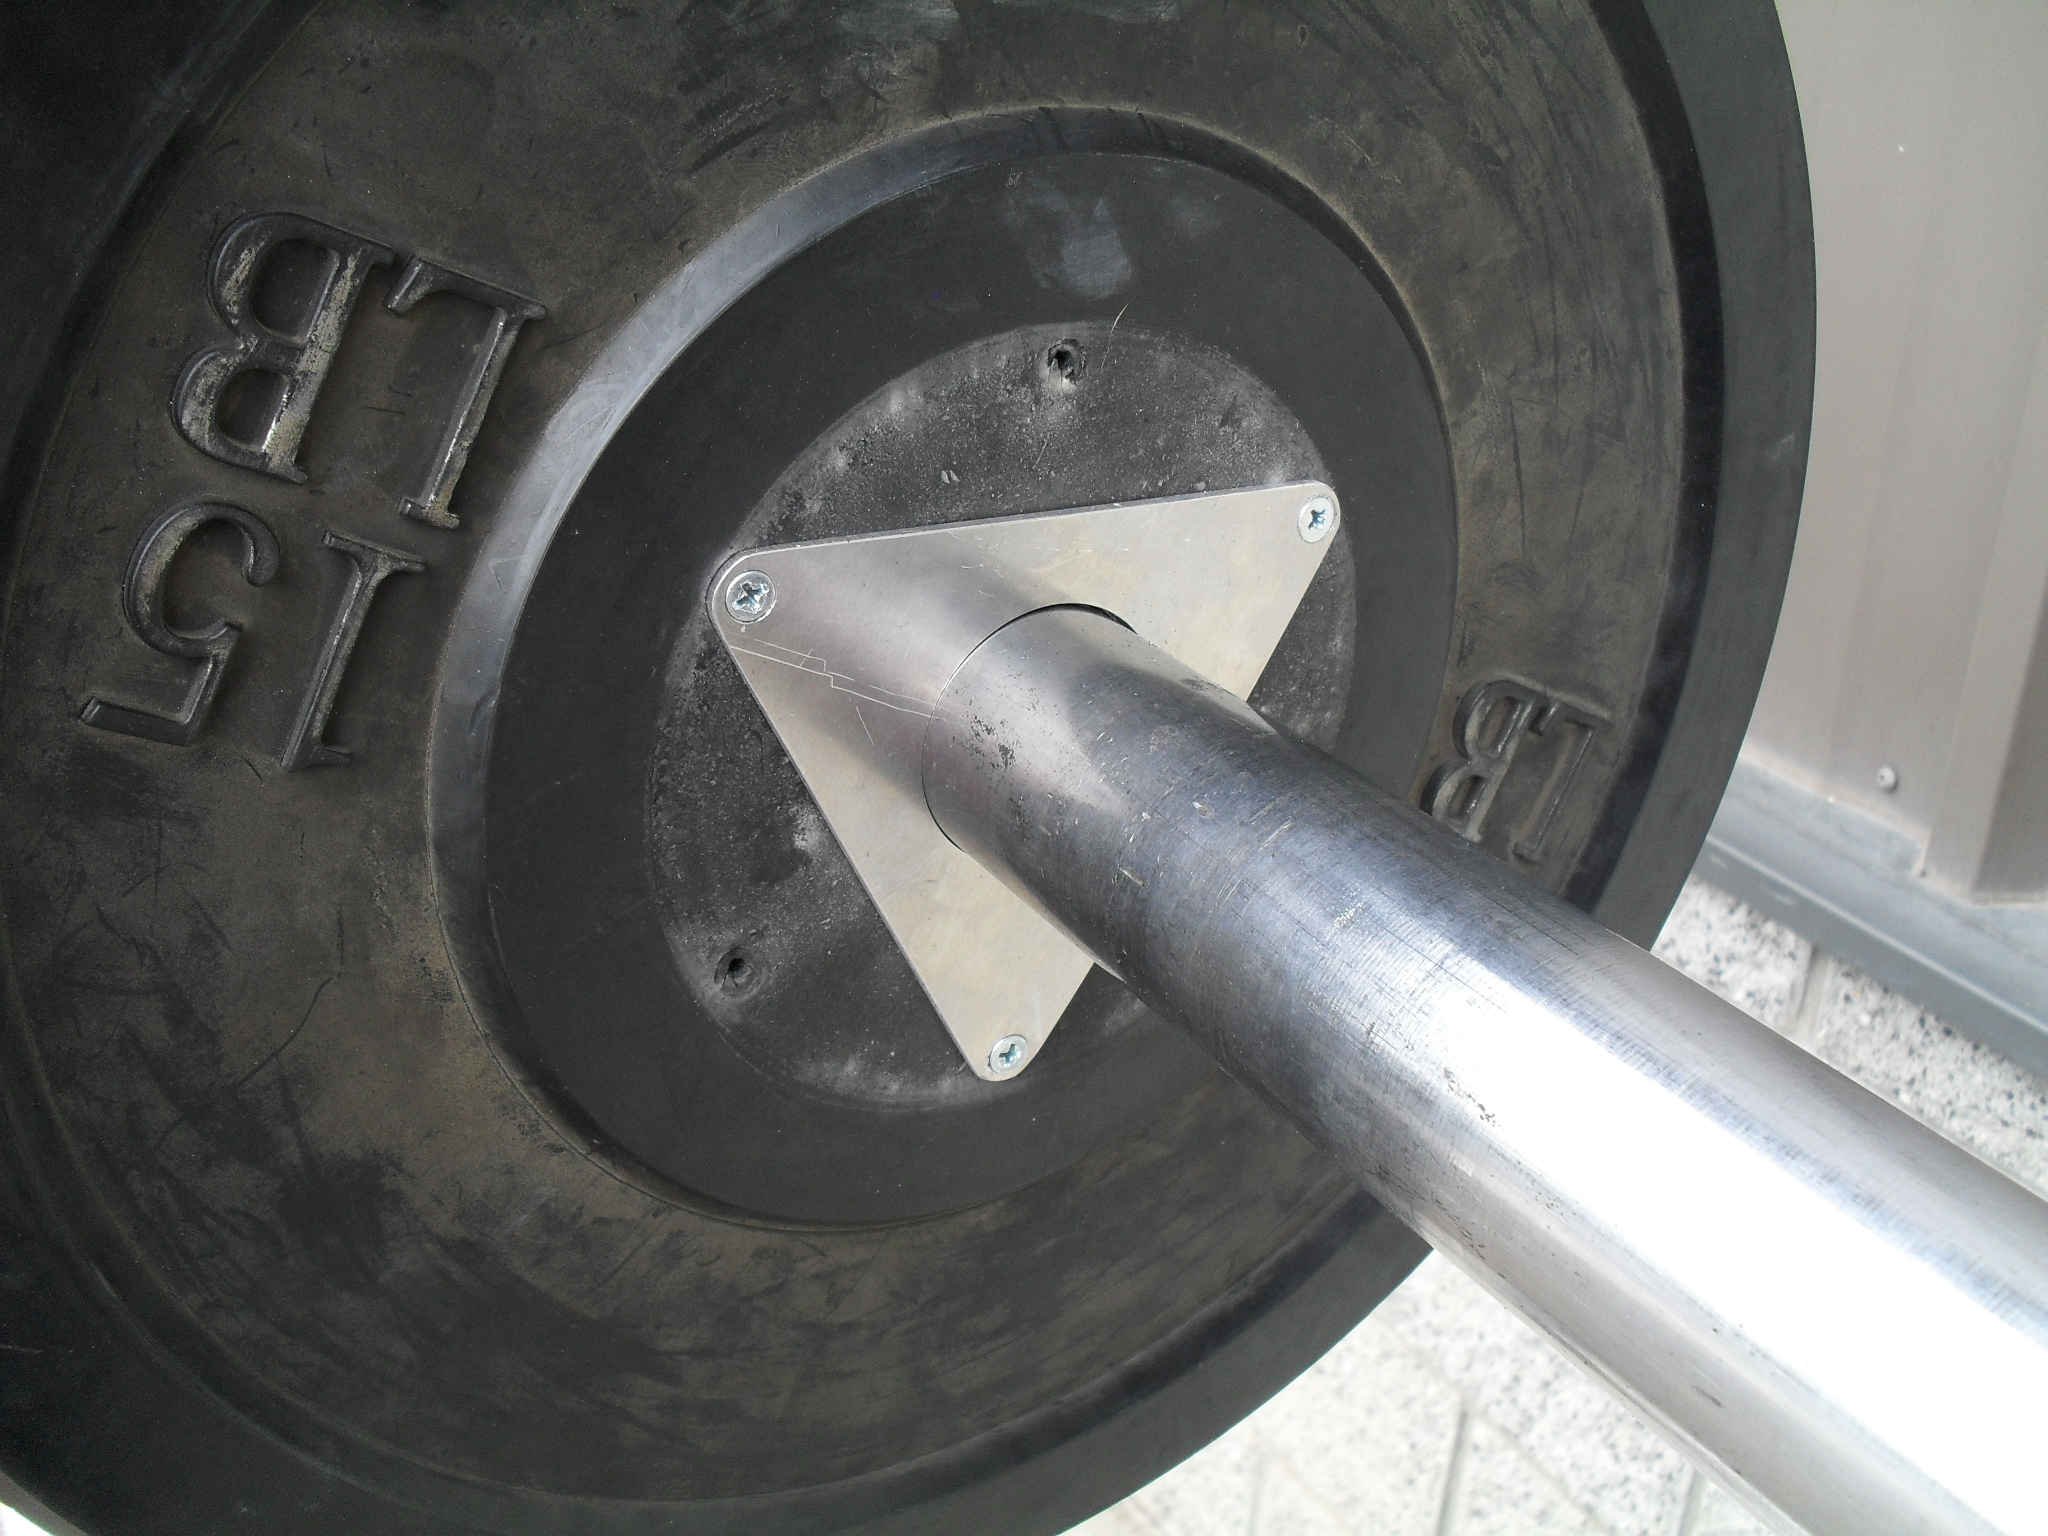 Step 8. Repeat the process on the other side installing the second repair plate. The opposite plate will be rotated about 60 degrees to clear the hardware of the first plate. Don’t forget to push the bumper against the bar flange to keep it perpendicular while securing the repair plate.
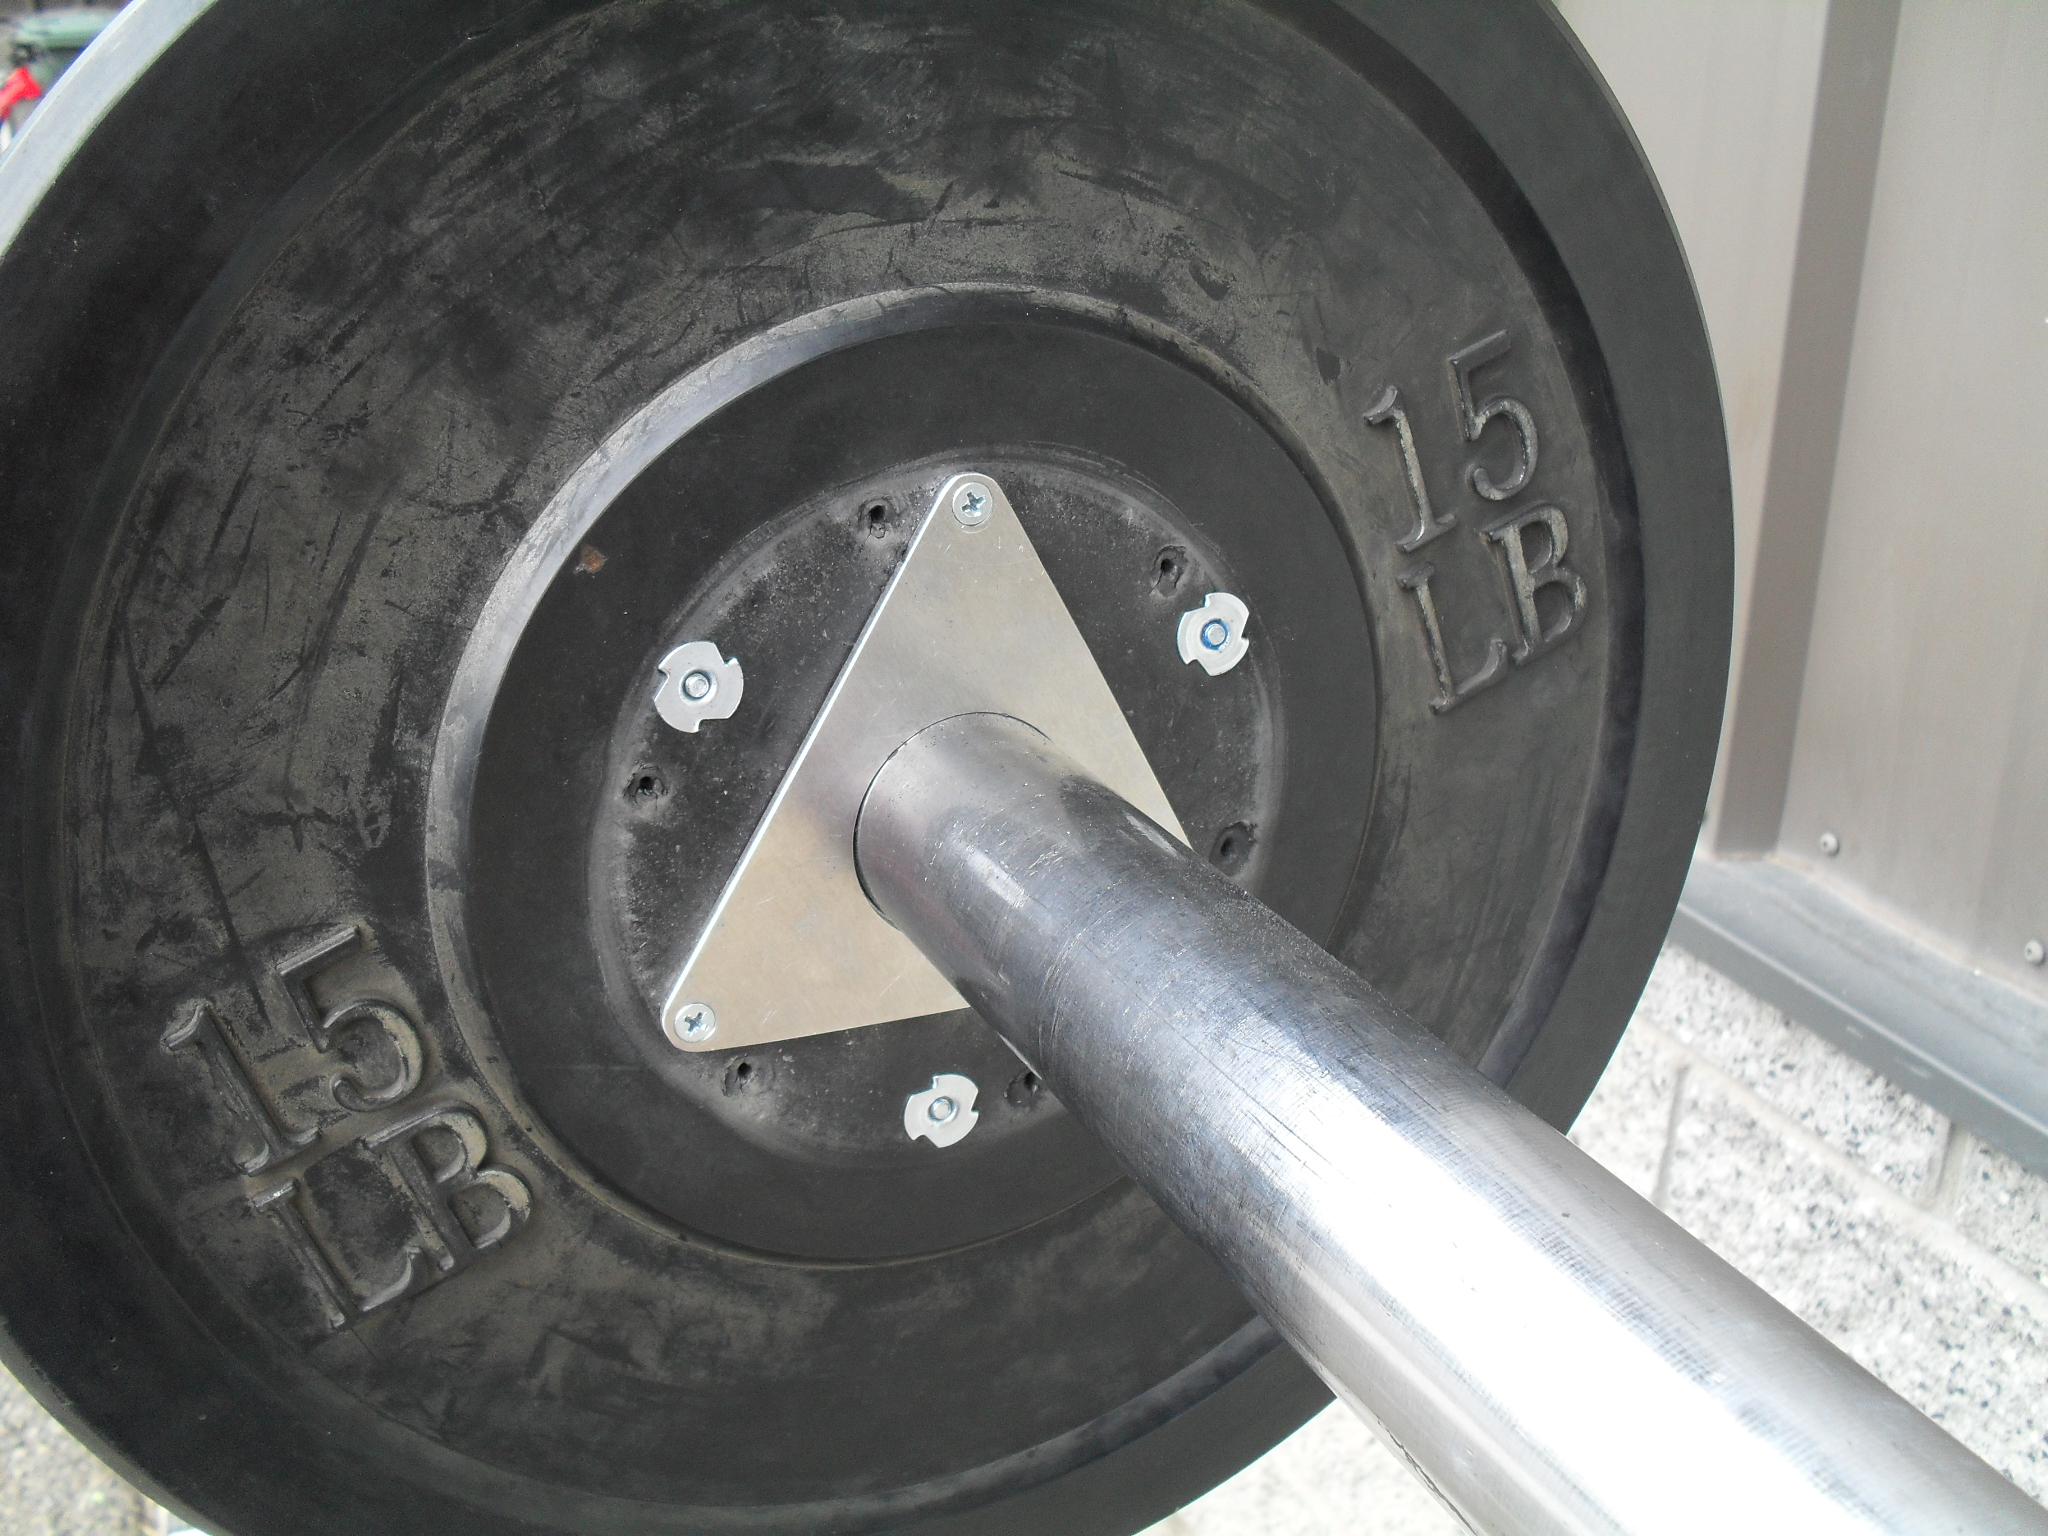 Step 9. One by one, back each mounting screw out five or six turns to expose some threads on the T-nut. Apply a drop of LocTite 243 Medium Strength Thredlocker to the T-nut threads and re-tighten the mounting screw. Loctite starts to cure in 5 minutes, so within that time frame, tighten up all the mounting screws to secure the loose center bushing to your satisfaction. Inspect often, and if a mounting screw loosens, take it out, clean it up, apply LocTite and re-tighten.